Authenticating a user is a pain. Your application has to ask for the user and password, look them up somewhere, get hold of the permissions this user holds and store them somewhere the application can use them. It all has to be done very securely, which means lots of things like salt in the passwords and https everywhere. Users want to be able to change their passwords, and you want to be able to ensure those passwords are not weak (ie stupid) and sometimes they lose their passwords and there needs to be some kind of work flow that allows them to get a new one without too much trouble, but ensuring it is way too much trouble for an impostor to do it.
Sometimes you want to get into extra technology like txt and fingerprints to establish who they are.
And none of this gets you any progress on the core application you are trying to build.
The answer is to outsource all this to an authentication server. The server does all the password management and passes you an authenticated user with a list of permissions and you must know this is absolutely reliable, which is also part of the challenge.
Fortunately a lot of work has been done on this and we have the OAuth2 standard which covers pretty much everything I’ve mentioned above. OAuth2 covers a lot of different scenarios and the one I am interested in for an application login is called the Authorization Code Grant. There’s a complex dance of requests and redirects that eventually delivers a logged in user. It looks like this:
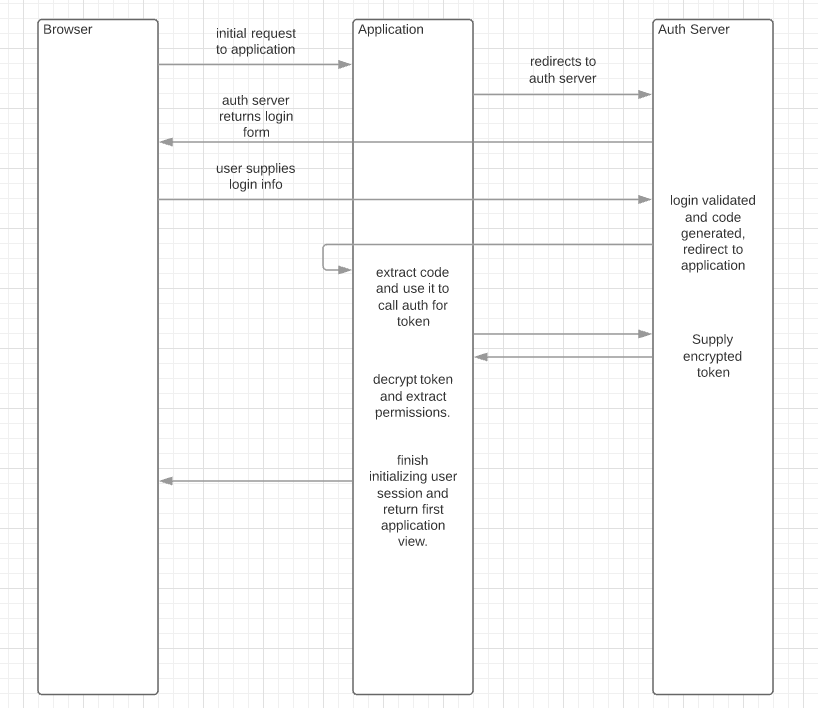
I made a simplification here in that the login to the auth server is two steps. One to supply a user and password and a second to authorize the requesting application to use that login. There is public/private key dance going on as well. The auth server supplies an encrypted token, the application has the decryption key (actually the public key). So the fact that the token decrypts okay tells the application the token really did come from the auth server.
The application needs to have a client id and a client secret to talk to the auth server in the first place. Client id, in this case, means the application, not the user.
Spring looks after this when you are using MVC but I am using Vaadin and I wanted to be able to switch any of my demos over to OAuth2 very easily. I also wanted to use Spring Security and leverage as much as I could off Spring’s code because it is already there.
The first part of this involved recognizing that we do not want to deploy an auth server to run a demo, so the demos had to abstract the login code out, but actually run it as a simple java library for the simple demo case, ie without needing an auth server. The OAuth2 solution only makes sense when you are moving to production. I had to show it could be done easily, but I also had to have a solution that was simpler to deploy as well. And the simpler solution had to be generic.
The simpler solution is madura-springsecurity-login. We built an earlier one called madura-login which doesn’t use Spring Security so I am going to ignore that in this post. Madura-springsecurity-login pops up a login dialog, looks up the user/password in a very short list held in memory (no, you can’t tell it if you lost your password, you can’t add more users without recompiling… I did say simple) and passes the resulting permissions to the application.
The application itself is unaware of the login, mostly. To configure one of our vaadin demos properly we only need three things:
- Add madura-springsecurity-login to the maven dependencies.
- Ensure that there is a web servlet defined for the /app/* url like this:
@WebServlet(name = “MyUIServlet”, urlPatterns = {“/app/\*”, “/VAADIN/\*”}, asyncSupported = true)
 public static class MyUIServlet extends SpringVaadinServlet {

private static final long serialVersionUID = 1L;
}- Add this code for the permissions manager:
@Autowired private PermissionResolver permissionResolver;
 …
 @Bean
 @UIScope
 public PermissionManager getPermissionManager() {
 PermissionManagerImpl ret = new PermissionManagerImpl();
 ret.setPermissionResolver(permissionResolver);
 return ret;
 }
The login code relies on a /login servlet which is declared in the dependency and there is a redirect dance between that and the /app servlet which is not unlike the one described above with OAuth2. The madura-springsecurity-login includes a couple of nice extra features. It allows you to change the locale on the login form and it presents a logo that pops up the application version id if you roll the mouse over it. The latter is perhaps always nice to have, but the former is only useful for demos where you want to switch locales to show the application running a different language.
All well and good but what about that OAuth2 thing?
There is another dependency: madura-oauth2-login. If you replace the madura-springsecurity-login with this you get the OAuth2 functionality. There is an extra configuration file you need, it must be called oauth.properties, in the top of your classpath, and it should look something like this:
oauth2.client.scope=default
 oauth2.client.grantType=code
 oauth2.client.accessToken=http://acme:acmesecret@localhost:9999/uaa/oauth/token
 oauth2.client.callback=http://localhost:8080/vaadin7-demo/login
 oauth2.client.client-id=acme
 oauth2.client.client-secret=acmesecret
 oauth2.client.authorizationUri=http://localhost:9999/uaa/oauth/authorize
 oauth2.client.keyPairName=test
These are the settings for the test server which is about the simplest auth server possible. So you need to deploy that server, or one compatible with it, for your application to work. There are lots of other options here. Places like Google, Facebook and Git all provide OAuth2 auth servers in various guises, but they do not all work transparently. The flow in all cases is the same but they sometimes change the specifics in the messages and redirections. So consider this a proof of concept rather than production code, you may need to adjust it for your server. They also need you to go register your application with them for good security reasons. But this complicates the demo scenario, which is why we supply the test server.
You also need to add a file called public.txt to the top of your classpath. This is the public key that goes with the private key you supplied to your auth server.
For a complete working example take a look at our vaadin7-demo project. It already has the public.txt and oauth.properties files in it. You only need to change the dependencies from madura-springsecurity-login to madura-oauth2-login and deploy the test server already mentioned.
Good luck.