I decided to make my builds a bit more automated, specifically my release process which is always a bit tedious. Travis offers a free CI service for open source projects so that was an obvious choice. After that things got a little less obvious. Travis is selling a service so their docs don’t really focus on what I wanted to do, which was publish my artifacts to Maven Central, but lots of people have done this so I should just find a blog post and follow their instructions right? Well, maybe. There are different instructions, different approaches and it was tricky figuring out what I actually need. Hence this post which describes how I got there.
This post is a good start, except I do not want to release snapshots to Maven Central. It tells you how to set up a Sonatype account and the necessary gpg keys which I already had because I have been deploying manually for years now. It also tells you about the extra detail you need in your pom.xml file which, again, I already had. Except that I did change my pom file to put the release-specifics into a separate profile as he suggests, though my profile is a bit smaller. I had the javadocs and the source generation in the main body and I left those there. I only moved the signing and staging to the new profile. You can see an example of what I ended up with here.
I also set up a maven settings file which was pretty much as described on that link. I put mine in a folder called travis so it is travis/settings.xml
Then I shifted over to this post. It describes how to set up the environment variables in your Travis project. You get to this area in Travis by selecting More Options on the top right, then settings. These are the variables you want to set up:
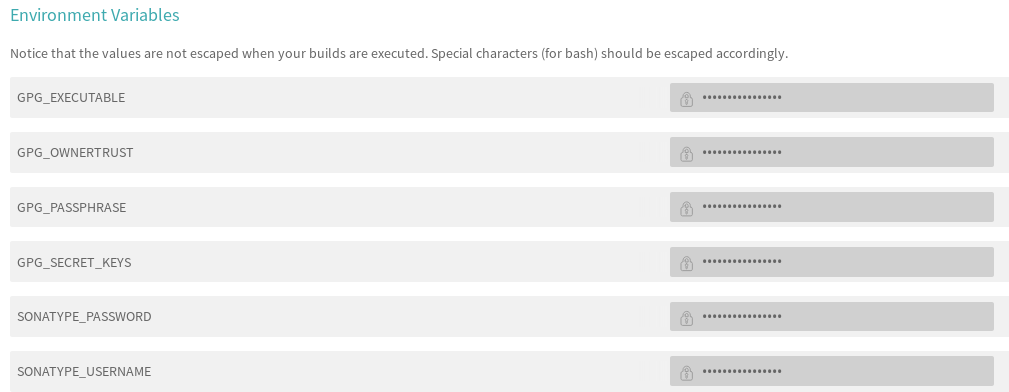
The post goes through all those so I won’t repeat it here.
Then all you need is a .travis.yml file in the top directory of your project. This took the most figuring out. Some people call shell scripts from the yml file but I found this works just fine.
    language: java
    jdk: oraclejdk8
    before_install:
    - echo $GPG_SECRET_KEYS | base64 --decode | gpg --import
    - echo $GPG_OWNERTRUST | base64 --decode | gpg --import-ownertrust

    install: mvn --settings travis/settings.xml install -DskipTests=false -Dgpg.skip -Dmaven.javadoc.skip=true -B -V

    deploy:
      provider: script
     script: "mvn versions:set -DnewVersion=${TRAVIS_TAG} && mvn clean deploy -DskipTests=true -B -U -P release --settings travis/settings.xml"
     on:
      tags: true
Once all that is in place you should see a build on Travis with each push, but not a deploy. When you want to deploy to Maven Central (ie a release) then create a tag with the release number such as 4.2.6, and push the tag. That will kick off a release build for the project which will deploy. You probably should edit the version number in your pom.xml file first.
Apart from simplifying the release process this also allows you to add a nice badge to your Readme.md file that tells about the status of the last Travis build so that people looking at your project can have some confidence it does actually build (and if it doesn’t build for them they know it is something they are doing, not a problem in the project). You can see the build badge reference in this file near the top.
But, although it works the .travis.yml file is not quite correct. When I implemented a multi-module build whose tests are quite complex I had to change it to this:
    language: java
    jdk: oraclejdk8

    before_install:
    - echo $GPG_SECRET_KEYS | base64 --decode | gpg --import
    - echo $GPG_OWNERTRUST | base64 --decode | gpg --import-ownertrust

    install: true

    script:
     mvn --settings travis/settings.xml clean install -DskipITs=false -DskipTests=false -Dgpg.skip -Dmaven.javadoc.skip=true -B -V

    deploy:
     provider: script
     script: "mvn --settings travis/settings.xml versions:set -DnewVersion=${TRAVIS_TAG} && mvn --settings travis/settings.xml clean deploy -DskipITs=true -DskipTests=true -B -U -P release"
     on:
      tags: true
This is because the install section is really designed around Ruby which doesn’t do an on-demand install like Maven does. If I do an install and not a script entry then travis will add a default script entry which doesn’t cope with the complex tests I need, something like mvn test -B. But the above .travis.yml file eliminates the install and runs the build and the tests in the script section. This post clarified this for me.
The deploy section runs two commands. The first is to change the version number in the poms (all the poms in the case of a multi-module project) the the contents of TRAVIS_TAG which is the tag that triggered the build. Because of tags: true this deploy section is only triggered if there is a tag present.
The project needs to have this in the pom.xml file:
    <profiles>
     <profile>
     <id>release</id>
     <build>
      <plugins>
       <plugin>
        <groupId>org.apache.maven.plugins</groupId>
        <artifactId>maven-gpg-plugin</artifactId>
        <version>1.5</version>
        <executions>
         <execution>
          <id>sign-artifacts</id>
          <phase>verify</phase>
          <goals>
           <goal>sign</goal>
          </goals>
         </execution>
        </executions>
       </plugin>
       <plugin>
        <groupId>org.sonatype.plugins</groupId>
        <artifactId>nexus-staging-maven-plugin</artifactId>
        <version>1.6.3</version>
        <extensions>true</extensions>
        <configuration>
         <serverId>ossrh</serverId>
         <nexusUrl>https://oss.sonatype.org/</nexusUrl>
         <autoReleaseAfterClose>true</autoReleaseAfterClose>
        </configuration>
       </plugin>
      </plugins>
     </build>
     </profile>
    </profiles>
This needs to be in every pom, including the parent poms. The last entry refers to a server id in the maven settings file which looks like this:
    <settings>
      <servers>
       <server>
        <id>ossrh</id>
         <username>${env.SONATYPE_USERNAME}</username>
         <password>${env.SONATYPE_PASSWORD}</password>
       </server>
     </servers>
     <profiles>
      <profile>
       <id>release</id>
       <activation>
        <activeByDefault>true</activeByDefault>
       </activation>
       <properties>
        <gpg.executable>${env.GPG_EXECUTABLE}</gpg.executable>
        <gpg.keyname>F360573B</gpg.keyname>
        <gpg.passphrase>${env.GPG_PASSPHRASE}</gpg.passphrase>
       </properties>
      </profile>
     </profiles>
    </settings>
The two SONATYPE entries refer to the environment variables. The GPG entries also refer to environment variables. With this in place the deploy is able to access your account on Sonatype to post the artifacts. It is also able to access your GPG key to sign the artifacts, which is a requirement for publishing to Maven Central.