An .epub file is a zip of a load of .css and .html files, and a few others. You can edit them by unzipping, using any old text editor, and zipping them back together. But it is easy to screw that up. More good news. Calibre, a product that has been around for ages, has hugely improved since I last looked at it. It now allows you to edit the .epub files in place, and it also offers valrious validation tools and a preview facility. Plus it runs on Linux so I don't have to jump through hoops getting it going under wine. I mention this last bit because Amazon offers some tools that only run on Windows and Mac, and they don't run under wine, so are useless to me. Turns out they are unnecessary anyway.
Mrs had a few specific requirements in the formatting though, mostly around the table of contents, and that was easily handled by Calibre. So our process becomes:
My application is running in Kubernetes and I have an Ambassador ingress permitting external traffic to come through to the services. The services all check for a valid JWT on the request and verify it is signed properly as well as having the right permissions to execute the particular service function requested. The JWTs are generated by Keycloak, which is running as a service inside Kubernetes.
In a single tenant situation this is simple enough. You'd have a realm in Keycloak that held the various secrets and credentials. You'd send a request to Keycloak specifying that realm and giving the credentials in various ways (client secret, login etc) and you'd get a JWT you could attach to subsequent requests. Each service would validate each JWT it found against that realm (the service caches the keys so it doesn't have to hit Keycloak all the time). All good.
But I have multiple tenants so it is a bit more complicated.
When I say tenants I mean separate legal entities. They should be blissfully unaware of each others' existenance and they certainly cannot mess with each others' data. I also want them to be able to maintain their own lists of users allowed to log in, but not each others' lists, of course. That means each tenant needs a separate Keycloak realm. Keycloak is built to handle multiple tenants and that is what its realms are for. So that's the problem solved for Keycloak. Not so much for everything else though.
The requests mostly originate from Angular applications (portals) running inside browsers. These applications don't actually know what tenant they want. All they have is a URL and different tenants have different URLs. So when a portal requests a JWT it cannot specify the Keycloak realm, it can only specify the URL for the tenant. It looks something like:
https://mytenant.com/auth/realms/bonanza/protocol/openid-connect/auth?client_id=login...
where the realm is bonanza
in my case and the client_id is login
. I'll mention that client_id further down.
I configure my ingress to edit this based on the host with:
apiVersion: getambassador.io/v2
kind: Mapping
metadata:
name: keycloak-tenant05-backend
spec:
prefix: /auth/
service: keycloak-service:8080
regex_rewrite:
pattern: '/(auth\/realms)/([^/]*)/(.*)'
substitution: '/\1/tenant05/\3'
host: www.mytenant.com
This causes all requests for a JWT to have the realm switched from bonanza
to tenant05
if the host domain name is www.mytenant.com
so the returned JWT will be specific to the tenant05
realm.
Naturally I don't do this manually, I have an automated process that creates a new tenant which creates the realm, edits the ingress and a few other things.
But we still haven't solved the whole problem yet. What happens when a service gets the request with this JWT? It wants to check the signature of the JWT and for that it needs a key from the right realm. How does it know what realm?
The solution is a little more editing of the ingress. I add the tenant to the request headers like this:
apiVersion: getambassador.io/v2
kind:...
]]>
When deploying to any kind of environment you do not just have some code to update. You have a whole ecosystem that has to be consistent. For example you may be deploying a piece of code that needs to talk to a database. Is the database there? Are you sure? Do you need to go look? It isn't just a database, there might be a queue, some kind of network infrastructure and a dozen other things. Did you check them all? What about the other pieces of code that are already running, are they going to work with this new code?
In a test system you can deploy and hope. Fix any problems. Repeat.
But not in a production system. You really have to know. And you have to be able to undo what you just did just in case it all went wrong.
Those are the kinds of issues I'm thinking about with the system I'm building. It's using GKE with Postgres databases, Pubsubs and a few other things. The different services are sensibly independent, all they know about each other is the APIs they use. But those might need to change, of course. I might want to introduce new services, and maybe new databases and pubsubs.
When I look for information about how to manage updating this I keep finding helpful stories showing me just how to update a single service. This is useful, but it doesn't address the problems I mentioned above. So here is my solution:
It starts with Terraform. Using Terraform I can define my Kubernetes cluster, my databases and pubsubs. I also use a Cloud Function and a few other things. Helm is often used in a similar way but Helm gets you things defined in Kubernetes. As far as I can tell it won't create a GCP Pubsub. So Terraform is my choice.
Terraform is good at comparing what is currently deployed with what the newly changed script specifies. So I can change my Terraform definition and just apply
it. Terraform works out what actually needs to be done and does it. Great. So if I want a new database or a new pubsub or an updated Cloud Function that just works.
It can be parameterised too. So I can define a set of variables the script needs, and I can define a set of values needed for each environment. For my test-dev
environment the parameters look like this:
project = "bill-rush-engineering"
region = "australia-southeast1"
environment = "test-dev"
environment-dns = "engineering.billrush.co.nz"
dbpassword = "mypassword"
test-mode = "true"
service-type = "ClusterIP"
deploymentType = "Recreate"
billrush_machine_type = "n1-standard-2"
billrush_min_node_count = 6
billrush_max_node_count = 9
So I have different domain names for...
]]>Just a little background. I built a Vortex Manipulator (basically a smart watch that runs on a Teensy3 and does a bit more than a simple clock. I wanted to have notifications from my phone appear on the watch’s screen via Bluetooth, actually BLE. This is about some of the unexpected things I found to get this working.
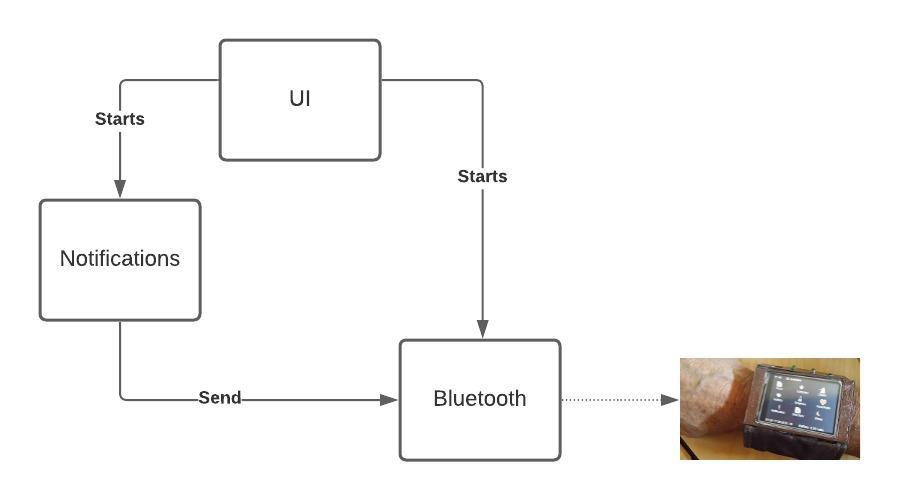
I knew from the start I needed three basic components. The UI, something to capture Notifications and something to handle Bluetooth. The UI could be trivial. I want to be able to start the app, connect to my BLE device and see some confirmation of that connection. Nothing more. So, while there is a lot of richness in the Android Studio for making great UIs, this was not my interest.
It needs to look something like this:
The way to define these relationships int Android Studio is to use the AndroidManifest.xml
file.
Mine looks like this.
<manifest xmlns:android="http://schemas.android.com/apk/res/android"
package="com.madurasoftware.vmble">
<uses-permission android:name="android.permission.BLUETOOTH" />
<uses-permission android:name="android.permission.BLUETOOTH_ADMIN" />
<uses-permission android:name="android.permission.ACCESS_FINE_LOCATION" />
<uses-permission android:name="android.permission.ACCESS_COARSE_LOCATION" />
<uses-feature
android:name="android.hardware.bluetooth_le"
android:required="true" />
<application
...
<activity
android:name=".MainActivity"
...
</activity>
<service
android:name="com.madurasoftware.vmble.BLEService"
android:process="com.madurasoftware.vmble.VMServices"
android:label="BluetoothService">
</service>
<service
android:permission="android.permission.BIND_NOTIFICATION_LISTENER_SERVICE"
android:name="com.madurasoftware.vmble.NotificationService"
android:label="NotificationService">
<intent-filter>
<action android:name="android.service.notification.NotificationListenerService" />
</intent-filter>
</service>
</application>
I've shortened this a bit to focus on the relvant bits. The full file is here).
The first thing to notice is the permissions. These have to be there in any app that wants to use Bluetooth. With this in place if the phone has Bluettoth turned off when the app starts then Android will ask to turn it on.
In the application
section there is the activity
which is essentially the UI I mentioned above, and two service
sections, one for Bluetooth and one for Notifications.
Now I want to cover what is inside these components.
Notifications, as noted above, are handled by a service. The service is NotificationService
and it
extends NotificationListenerService
which is supplied by the Android environment. There is not too much
to it. It hears about a notification when its onNotificationPosted()
method is called. It filters
the notification (there are a lot of system notifications I don't want to see) and formats the result
suitable for sending, then it passes the notification to the Bluetooth service.
I'll come back to that last bit later on. It's really interesting.
The Notification service is launched from the MainActivity
with this code:
val notificationIntent = Intent(context, NotificationService::class.java)
notificationIntent.putExtra(BLEService.CONNECTION,d.address)
context.startService(notificationIntent)
There is just a little more to it but that's the main part. We create an intent and launch a service. The service stays running in the background (or seems to). When a notification arrives it handles it.
Now let's go back and look at the code that passes the notification on to the Bluetooth service:
val connectIntent = Intent(this.applicationContext, BLEService::class.java)
connectIntent.putExtra(BLEService.MESSAGE,message)
connectIntent.putExtra(BLEService.CONNECTION,mBluetoothDeviceAddress)
this.applicationContext.startService(connectIntent)
Look familiar? Yes, it is just another start service call. I find it odd because I already started the service when I selected the BLE device to connect to. But believe me...
]]>I'm not going to go into the details of my function, this post is about how I secured it. It is really easy to deploy these things so they are accessible to the entire world. You can check the incoming call in the function and reject any that don't look like they should be there. But actually GCP will do that for you.
Now initially I did deploy it with public access. You just issue this command:
gcloud functions add-iam-policy-binding FUNCTION_NAME \
--member="allUsers" \
--role="roles/cloudfunctions.invoker"
But I wanted to change from allUsers
to allValidatedUsers
which would make GCP look for a valid JWT attached to the HTTP request.
A JWT (JSON Web Token) is neat mechanism, though it is kind of convoluted. It is part of the OAuth2 security standard, so it is very well supported. Once you have a JWT you attach it to your HTTP request like this:
curl --location --request POST 'https://CLOUD_FUNCTION_URL?Content-Type=application/json' \
--header 'Authorization: bearer eyJhbGciOiJSUzI1NiIsImtpZCI6IjI1N2Y2YTU4MjhkMWU0YTNhNmEwM2ZjZDFhMjQ2MWRiOTU5M2U2MjQiLCJ0eXAiOiJKV1QifQ.eyJhdWQiOiJodHRwczovL3VzLWNlbnRyYWwxLWJpbGxpbmctdGVzdC0yMzY4MDQuY2xvdWRmdW5jdGlvbnMubmV0L2dvcHVic3ViIiwiYXpwIjoidGVzdGhhcm5lc3Mtc2FAYmlsbGluZy10ZXN0LTIzNjgwNC5pYW0uZ3NlcnZpY2VhY2NvdW50LmNvbSIsImVtYWlsIjoidGVzdGhhcm5lc3Mtc2FAYmlsbGluZy10ZXN0LTIzNjgwNC5pYW0uZ3NlcnZpY2VhY2NvdW50LmNvbSIsImVtYWlsX3ZlcmlmaWVkIjp0cnVlLCJleHAiOjE1ODYxMjY3MzgsImlhdCI6MTU4NjEyMzEzOCwiaXNzIjoiaHR0cHM6Ly9hY2NvdW50cy5nb29nbGUuY29tIiwic3ViIjoiMTAzNzM5OTg4NjQwODY0NjQ2OTQ1In0.MyKqA6t0n2q0GeVAk69LAf5FzgVcMISQ3_1W1J6iTwMb7eDLJbkFlaWjbjgQo3wtcOTypgR5Xd9I0t-izuWvPN_kYDkr5X94FwIovUUe9hnZd3MKDxeWCb_rknVbdKBVY2fBmvs7MX3eCnfkxXK0ZEmsdhB1EBry9_8vNgV28T3z80aqaisli8yDbQLcHLtcR9C0zlY0yw52xp7aHEB0v79yXft3J2HNUNNVuyMknQmCst-8uFveZE3g19eGl7FZWvtR1z_4iYVl_eIhHxFM5VE_cZUg3PbPKZFTDigSwFeSWcDBt56BYJg-0wT_cKqm9keUr54ZRj6cujPCZp5dIg' \
--header 'Content-Type: application/json' \
--header 'Content-Type: text/plain' \
--data-raw '{
...
}
The JWT is that huge string in the Authorization header. Because the JWT is so long it has line wrapped, but it is really just one long line. It is an encrypted string, using the secret key associated with your GCP account. Naturally GCP knows how to decrypt that so when this request arrives it unpacks it and checks that it looks okay. If it does then the request is passed into the function. Nice eh?
The information in the JWT includes who the current user is and also an expiry time. Some JWTs last only a few milliseconds and, once expired, they are no longer valid.
One of the advantages of the JWT is that it can be passed on from one call to another. For example my Cloud Function may call another Cloud Function. It can include the same JWT, and it doesn't need to generate a new one, eliminating a possible bottleneck as we shall see.
But how did we get that JWT? Easy, you just make sure you are logged into GCP and do this:
gcloud auth print-identity-token
That will print the huge string you saw above, or one similar. What it does under the covers is send a different HTTP request to a different URL with enough information to do the generation. If you use the gcloud
command like that you don't have to care much about how it happens. But I need to call my Cloud Function from Java, that means I need to find out more about that initial request.
I started by looking...
]]>The Java code I was trying to test relied on a large-ish object graph and the most accurate way to generate this is to run the code that already builds it. And that was harder than it should have been. My intial plan was to create a JSON document that the existing code would unpack into the graph and then pass that into the new code I was testing. The existing code already takes a JSON document and I had samples of the JSON I needed. It unpacked the JSON, did various necessary things to it, and produced the graph I needed.
But the existing code did some other operations too. For example it saved it all to a database, and it fired off various events. It possibly did more (inherited code so I would have to dig into it to know). There are ways of handling this. I could mock those other operations so that, for example, instead of firing an event the mock would do nothing. I could add an H2 database to my test so that the database writes would write to a freshly constructed memory-only database. I could. But this is when I started wondering if I should have to.
With a slightly different design for that existing code, one that separated the object handling from the peristence and the other operations, life would be much simpler. But this wasn't obvious at design time. The object graph I'm using is quite pure domain code, not riddled with operational logic as you might be thinking at this point. No, those objects are all just fields and getters and setters. The operations are in separate service objects that manipulate them. But that service code does a lot of transformation work getting from the structure dictated by the incoming JSON to the structure required by the database. It is that transformation code (and that code only) that I need to use in my test.
Let's look at a contrived example that is a lot simpler than the one in real life:
class CustomerServiceImpl implements CustomerService {
@Autowired CustomerRepository customerRepository;
@Autowired ApplicationEventPublisher applicationEventPublisher;
public void unpackCustomer(IngestedCustomer ingestedCustomer) {
final Customer customer = Customer.builder()
.invoices(
ingestedCustomer.getInvoices().stream()
.map(invoice - transformInvoice(invoice))
.collect(Collection::List))
.name(ingestedCustomer.getName())
.build();
customerRepository.save(customer);
applicationEventPublisher.publishEvent(new CustomerUpdated(customer)
}
}
We're unpacking the customer record that has invoices attached and persisting them, then we generate an event. Now, this would be easier for me if the class looked like this:
class CustomerServiceImpl implements CustomerService {
@Autowired CustomerRepository customerRepository;
@Autowired ApplicationEventPublisher applicationEventPublisher;
public Customer unpackCustomer(IngestedCustomer ingestedCustomer) {
return Customer.builder()
.invoices(
ingestedCustomer.getInvoices().stream()
.map(invoice - transformInvoice(invoice))
.collect(Collection::List))
.name(ingestedCustomer.getName())
.build();
}
public void persistCustomer(IngestedCustomer ingestedCustomer) {
customerRepository.save(unpackCustomer(ingestedCustomer));
applicationEventPublisher.publishEvent(new CustomerUpdated(customer)
}
}
With that I could call unpackCustomer directly, get the functionality I want and none of the persistence... except that the repository and event publisher are still being injected and still have to...
]]> public class ClassWithAMap {
private Map<Range<Instant>, String> map;
@JsonCreator
public ClassWithAMap(
@JsonProperty("map")
@JsonDeserialize(keyUsing = RangeDeserializer.class)
@JsonSerialize(keyUsing = RangeSerializer.class)
Map<Range<Instant>, String> map) {
this.map = map;
}
public Map<Range<Instant>, String> getMap() {
return map;
}
public void setMap(Map<Range<Instant>, String> map) {
this.map = map;
}
}
The special bit is in that constructor. It has annotations on its arguments specifying the serializer and deserializer. This tells Jackson to delegate those oprations to the named classes. I found various other ways to annotate the class, for example on the properties. But those didn't work for me (on Jackson 2.9.9) and I had to resort to StackOverflow to get the right answer.
Next I had to specify the serializer and deserializer. They're fairly simple:
public class RangeDeserializer extends KeyDeserializer {
@Override
public Range<Instant> deserializeKey(String key, DeserializationContext ctxt)
throws IOException, JsonProcessingException {
TypeReference<Range<Instant>> typeRef = new TypeReference<Range<Instant>>() {
};
Range<Instant> range = objectMapper().readValue(key, typeRef);
return range;
}
}
The usual way to call readValue
is to just supply the class and Jackson takes care of the read. When there are generics involved you need that TypeReference
which can specify the generics.
public class RangeSerializer extends JsonSerializer<Range<Instant>> {
@Override
public void serialize(Range<Instant> value,
JsonGenerator gen,
SerializerProvider serializers)
throws IOException, JsonProcessingException {
StringWriter writer = new StringWriter();
objectMapper().writeValue(writer, value);
gen.writeFieldName(writer.toString());
}
}
This is the serializer and there is not much to it, but if you leave it out Jackson seems to call .toString()
on the key to get the serialised value, and in this case that is wrong hence the need for the custom serialiser.
Now you can happily write code like this:
Map<Range<Instant>,String> map = new HashMap<>();
Range<Instant> key = Range.greaterThan(Instant.now());
map.put(key, "some value");
ClassWithAMap classWithAMap = new ClassWithAMap(map);
String jsonInput = objectMapper()
.writerWithDefaultPrettyPrinter()
.writeValueAsString(classWithAMap);
ClassWithAMap classWithMap = objectMapper()
.readValue(jsonInput,
ClassWithAMap.class);
But there's one more thing here. Range
is in the Google Collections library and it needs some special configuration in the object mapper, as does Instant
. This is what works:
public ObjectMapper objectMapper() {
return new ObjectMapper()
.registerModules(
new JavaTimeModule(),
new Jdk8Module(),
new GuavaModule());
}
]]>
Still, the task is fundamentally the same.
Maven Central has particular requirements for publishing such as supplying source, javadocs and signing everything. These are all reasonable, but doing them for Kotlin is different. I found lots of examples but nothing that took me through the whole process, whcih turns out to be reasonably easy once you know. Also there have been some changes to the process so I went down rat holes working with things that have been superseded and adding solutions to problems that are no longer there. The result is this library and the build/publish setup is tested and working and fairly simple. Lots of people have done a lot of work to make it this easy, so the credit for this goes to them, including but not limited to:
]]>To make the icons I use Gimp to create a 28x28 pixel image then export it as a .h file. This .h file cannot be directly used because it is an awkward format. So I pass it through a transformation I wrote in C++.
Because this is just a utility, and I only have 10 icons I just paste the output from Gimp into a static char * in MakeIcons.cpp. You'll find then all near the top. Then in the main method I process each one. For each of them I create an Icon object and then call the Icon's draw() method. That writes out the bitmap in a useable format. The smart stuff in this is in that draw() method where it does a lot of bit shifting etc to get the 16 bit output right. And then it prints it out. The result looks like this:
static uint16_t myicon[] PROGMEM = {
0x0000,0x0000,0x0000,0x0000,0x0841,0xffdf,0xffdf,0xffdf,0xffdf,0xffdf,0x0841,0x0000,0x0000,0x0000,0x0000,
0x0000,0x0000,0x0841,0xffdf,0xffdf,0xffdf,0xffdf,0xffdf,0xffdf,0x0000,0x0000,0x0000,0x0000,
0x0000,0x0000,0x0000,0xf79e,0xffdf,0xfa8a,0xf8c3,0xf8c3,0xf8c3,0xf9c7,0xe410,0xf79e,0x0000,0x0000,0x0000,
0x0000,0xf79e,0xffdf,0xfa08,0xf8c3,0xf8c3,0xf8c3,0xfa49,0xffdf,0xf79e,0x0841,0x0000,0x0000,
...
In my main project (the one that actually displays the icons) I paste that bitmap into the relevant cpp file and draw it with code like this (assume the *icon points to the 16 bit icon):
int count = 0;
for (unsigned int j = 0; j < size; j++) {
for (unsigned int i = 0; i < size; i++) {
uint16_t pixel = icon[count++];
if (reversed) {
pixel = ~pixel;
}
Graphics.drawPixel(x + i, y + j, pixel);
}
}
The size variable is almost always 28 because we started with a 28x28 pixel image. But you can change the size and you'll see I do this in the last bitmap which is a 14x14 image. The same code is used to display that icon, as long as I tell it the right size. I can also optionally reverse the image by setting a flag which just negates each pixel.
The project is in github.
]]>But what they don't do is offer a way to have multiple loggers. For example in my current project I want to see debug messages for the display subsystem, but there are lots of debug messages generated from the clock. Can I turn off the messages from the clock and just see the display stuff? Nope. Not without editing the code and commenting out the messages I don't want to see. And even if I do that I might find I need to uncomment them tomorrow. It gets a bit tedious.
Now, in Java you have multiple logger objects, and each of those has its own debug level. I'm used to that and, on an Arduino project that now has 20 cpp files, I really feel the need of a better logging mechanism.
That's why I built ArduinoLogger.
At this point I need to digress a little an mention that I don't actually make much use of the Arduino IDE itself. I use an Eclipse based IDE called Sloeber which does all the things Arduino does but is a lot better when your file count grows. It also supports git which is much easier than going out to the command line for that. I tend to think in terms of C++ rather than ino files and I use lots of classes. I'm building code to run on a Teensy 3.2 which has plenty of memory so a bit of memory overhead for a logger is not a problem. On a smaller device you probably aren't working on such a large project, so you probably would not want, or even need, the overhead.
So let's see what it looks like.
The library is called ArdunioLogger and is in a zip file at https://madurasoftware.com/ArdinoLogger.zip. To install it download the zip and you can use the Arduino IDE to install it. Use Sketch>Include Library>Add .ZIP Library... to import the library.
After that you will find a sample in the IDE samples (File>Examples and look for ArduinoLogger) which is a good place to start. Or you can just unzip the file into ~/Arduino/libraries which is where the IDE unpacks it to. Once unpacked both IDEs can see...
]]>