This is how to get your Eclipse AVR to play nice with Attiny and with Teensy.
The Arduino IDE is a fine piece of work, but I’ve been using Eclipse for years and I prefer that for a number of reasons. If I had to pick just one I’d point to integrated source code management, but there are other reasons too.
So, with this in mind I decided to take a look at the Eclipse AVR plugin. Initially it didn’t work too well for me until I could Jan Baeyens‘ fork of the plugin which has some extra setup built in. As far as I know the instructions there work out-of-the-box for proper Arduino boards, but since I don’t actually use them I had some extra work to do. Specifically I wanted to get Attiny ICs and Teensy boards working in this environment.
Let’s summarize my environment first.
- Ubuntu 11.10. It probably makes little difference if you are running Windows or Mac, but just so you know.
- Eclipse Indigo (Indigo Service Release 2 Build id: 20120216-1857)
- Arduino Eclipse Extensions 1.2.3
- Attiny85
- Teensy 2.0
- Teensy Loader 1.06 (from www.pjrc.com)
Building for the Attiny
To flash the Attiny I have the setup described in an earlier post, so my laptop has a USB cable plugged into a Teensy which acts as an ISP to flash the Attiny85. This works fine from the Arduino IDE so from a hardware point of view we are all good.
If you installed Eclipse and Jan Baeyens’ plugin already you probably pointed to your existing Arduino files. You need to change that. The best approach is to clone your entire Arduino IDE directory tree. That way any changes won’t mess up your working Arduino IDE (and, believe me, these changes will mess it up otherwise). Just how to point the plugin to another directory is described further down.
I’m also assuming you already set up your Arduino IDE to handle Attiny (again, see my earlier post) and the Attiny files are in your cloned Arduino IDE. We will refer to the cloned Arduino IDE directory tree as and we will ignore the original one from now on.
The next steps need you to look in this directory structure
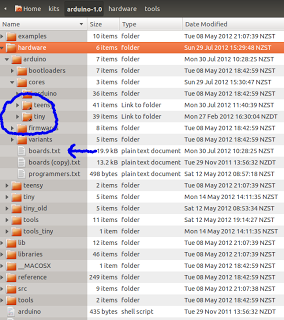
There are two things to do here. Under /hardware/arduino/cores I have added two links, one to the attiny files (/hardware/tiny/cores/tiny) and one to the teensy files (/hardware/teensy/cores/teensy). If you are using Windows, which doesn’t support links, you can just copy the directories over. They are not very big.
The second thing is to edit the boards.txt file and add the Attiny entries. You can just copy the entries over from /hardware/tiny/boards.txt but there is a catch. Each variant has a line like:
attiny85at1.name=ATtiny85 @ 1 MHz (internal oscillator; BOD disabled)this is always the first line and it describes the board variant. The problem here is the semicolon. So when you copy/paste the entries into your boards.txt file make sure you remove the semicolon like this:
attiny85at1.name=ATtiny85 @ 1 MHz (internal oscillator BOD disabled)
Also add the following entry
attiny85at1.upload.protocol=stk500v1This ensures it uses the Teensy as an ISP. If you’re using something else you might need a different setting.
Once you have your boards.txt edited open up eclipse (restart it if you already had it open) and check the Windows->Properties.
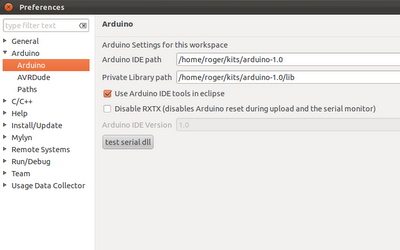
Make sure your Arduino IDE path is your cloned path.
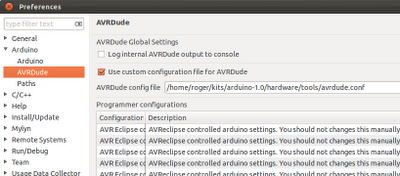
Make sure your avrdude configuration file is properly set up.
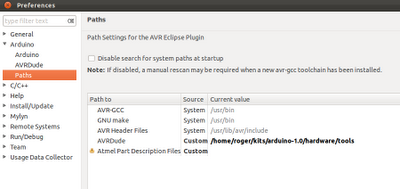
Finally make sure the paths look like this (your arduino file can be in a different place, of course)
After that you can just follow Jan Baeyens’ instructions for creating projects etc. If you create a new project for your Attiny it will automatically create a library project holding the core Attiny files. When you build your project it will reference the library project (well done, Jan!). You want to build your library project first, though or things might get confused.
To flash the code to the Attiny once it is built the plugin calls avrdude, which is what the Arduino IDE uses as well. Open the properties for your Attiny project (mine is called Blink).
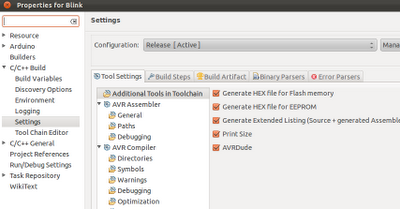
On the lower right you can see the AVRDude option is picked.
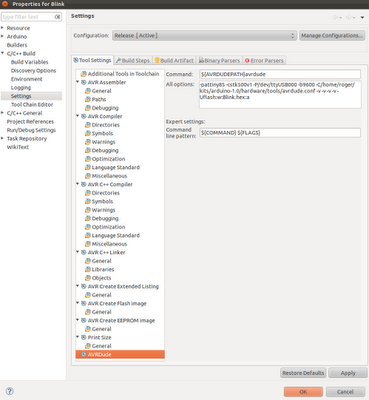
Check the avrdude command line looks roughly like this.
And that should work. A build should build the project, create the hex file and launch avrdude to send it to the Attiny through your ISP which, in my case, is a Teensy.
Building for the Teensy
If you already worked through the Attiny setup then you are okay to proceed, if not then do the following steps described more fully above:
- Clone your Arduino IDE directory
- Install the plugin and point to the cloned directory.
- Make sure the paths in your Windows->Preferences are as described in the Attiny section.
Now edit your /hardware/arduino/boards.txt file and add the Teensy board descriptions. You can find the descriptions to paste in /hardware/teensy/boards.txt, but these have a lot of stuff you don’t need. You can safely remove all the *.menu.* entries. Also add the cpu speed eg:
teensypp2.build.f_cpu=16000000L
(this is for Teensy 2.0, but you can run Teensys at different speeds if you want)
Take a look in your teensy directory (). In mine there was a file called main.cxx which was empty and another called main.cpp which had a main() method defined. The compiler picked up the first but not the second and then the linker complained of a missing main() method. Just remove the main.cxx if you have one.
Restart Eclipse and create a project for your Teensy. This can take a while, a couple of minutes or so, while it creates the library.
Build the library.
Open your project properties and, as with the Attiny, ensure avrdude is enabled in the toolchain but we are not actually going to use avrdude, we are going to use the teensyloader so we need to adjust the avrdude settings by changing project properties like this:

My teensy tools will be in a different directory to yours but you can adjust that. Notice that we are invoking teensy_reboot and also notice that under Expert Settings we have removed the ${FLAG} parameter. Don’t worry about the ‘All options’ box, that will not be used.
There is one more trick before this all works. The teensy loader, that’s the executable called just ‘teensy’ and is in the same dir as teensy_reboot, needs to be already running, so you need to manually start that. Once it is running teensy_reboot will tell the teensy loader to flash the teensy board with your new code.